|
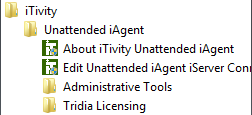
7. Using the Unattended iAgent on Windows
The Unattended iAgent provides for remote viewing and administration of Windows systems. This iAgent can be installed from a distribution MSI or custom EXE. It provides a persistent, "always-on" connection. If the connection is lost, the Unattended iAgent automatically attempts to reconnect. This chapter explains the menu options available on the computer where the Unattended iAgent is installed. For installation instructions, see Chapter 5 in this guide. Note: For information on installing and running the Unattended iAgent on UNIX/Linux systems, see Chapter 8. 7.1 Unattended iAgent Start Menu Options
When the Unattended iAgent is installed, the following options are made available on the Windows Start menu.
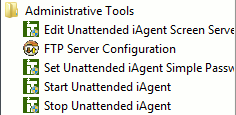
7.1.1 Administrative ToolsThe Administrative Tools menu option presents a flyout menu with additional options.
7.1.1.1 Edit iTivity Screen Server Settings
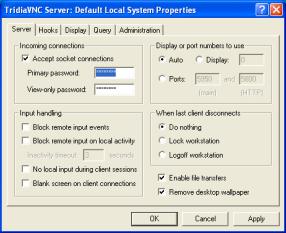
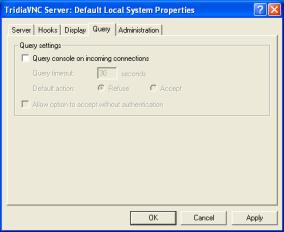
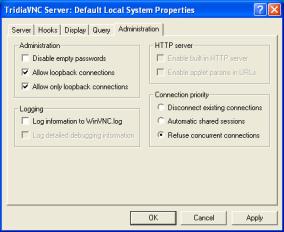
This option can be used to edit the default settings for the TridiaVNC Server module. This module runs as part of the Unattended iAgent to allow remote control and viewing of the computer. Note: When the Unattended iAgent is active, the computer is considered a VNC host. The term TridiaVNC Viewer refers to the module (part of iManager) that views the iAgent on the remote computer. See Section 4.4 for information. Choosing this option displays the TridiaVNC Server: Default Local System Properties dialog, with the following tabs. Server Tab
Incoming connections Accept Socket Connections: When this option is checked (the default), the computer accepts direct, socket-based connections from the viewer program. Clearing this checkbox disables incoming view connections from iTivity iManager. However, file transfer connections are still allowed. Primary password: Not used by iTivity. Do not change this option. View-only password: Not used by iTivity. Do not change this option. Display or port numbers to use Auto or Display (Number): Indicates whether the TridiaVNC viewer will use the first display number not already in use on the host machine (Auto) of the display number specified in the adjacent Number field. Default is Auto. Ports: TridiaVNC server listening ports: This option is not used by iTivity and is disabled by default. Input handling Block remote input events: When checked, any new incoming connections will be able to view the screen but not send any input. Default is unchecked. Block remote input on local activity: When checked, this option disables remote keyboard and pointer when the local user keyboard or mouse is active. Default is unchecked. When checked, you can set the inactivity timeout in seconds in the following field. No local input during client sessions: When checked, keyboard and mouse input from the local computer user is disabled during a TridiaVNC viewer session. Default is unchecked. Blank screen on client connections. When checked, the local computer screen is blank during a TridiaVNC Viewer session. Default is unchecked. When last client disconnects: This option indicates what action to be taken when the last TridiaVNC viewer disconnects from the local (host) machine: · Do nothing- Take no action (Default). · Lock workstation- Lock the local computer. · Logoff workstation- Log-off the current user. Enable file transfers Enable the TridiaVNC Server file transfer function. This is a alternative to the iTivity File Transfer function and is not typically used with iTivity. Remove desktop wallpaper: When checked, the TridiaVNC server removes the desktop wall paper during client TridiaVNC viewer sessions. This improves screen update performance. Checked by default. Hooks TabPolling modes Poll foreground window When checked, the VNC Viewer polls only the currently selected window for changes. This is less CPU-intensive than full-screen polling and often gives similar results. This is true, for example, when using the Command Prompt, which is not normally compatible with iTivity. Poll Window Under Cursor A variation on Poll foreground window, this option causes the window under the mouse cursor to be polled for changes. Both options may be enabled simultaneously, if required. Poll full screen When checked, the entire screen is polled for changes. Some applications are incompatible with the methods used by iTivity to trap screen updates. For this reason, it is sometimes useful to be able to poll the entire screen to check for changes. This tends to sacrifice performance for accuracy. Polling cycle Determines how often (in milliseconds) the server polls for screen updates. Default 300 ms Window polling Poll console windows only When checked, only Command Prompt windows are polled. This works well in conjunction with Poll Window Under Cursor, to use polling only when the cursor is over a console window. Poll on event received only When checked, the screen is only polled for updates when a mouse or keyboard event is received from the iTivity iManager. This is provided for low-bandwidth networks, where it may be useful to control how often the screen is polled and changes sent. Mirror driver status The mirror driver is a third-party device driver for tracking screen updates. Using the mirror driver greatly increases the speed and reliability of updates, and also decreases CPU utilization on the server. The Mirror driver status area reports on the status of mirror driver usage when the iAgent is connected to an iManager. Note: For information on the installing and using the mirror driver, view the Tridia support site FAQs (at the following URL) and search on "mirror driver": https://support.tridia.com/faq/faq.php Mirror driver options Enable direct access to display the driver's mirror screen: Check this option for optimal performance using the default configuration of the mirror driver. Default is checked. Troubleshooting Don't use mirror display driver even if available: Check this option to disable use of the Mirror driver. Display Tab
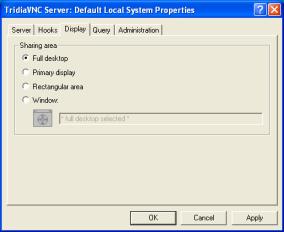
Sharing area These options indicate the area of the iAgent screen that is shared and visible to an iManager user. · Full desktop - Share the entire server desktop. Default. · Primary display- Share the primary console screen. · Rectangular areaSelect and share a region of the screen. When selected, a rectangle appears on the screen that you can drag to resize and indicate the area to be shared. Window - Select and share a window on the screen. Click and drag the target icon in the dialog to the desired window on the screen. The selected window title appears in the Window text box. Query Tab
Query settings The options on this tab are not used with iTivity. Administration Tab
Administration Disable empty passwords - Allow empty password with client connection authentication. Caution: Do not check this box as it may cause iTivity authentication to fail. In most cases iTivity controls authentication, and the TridiaVNC Server authentication is disabled. However, if you check this option then iTivity authentication will fail with any authentication setting other than Simple Password. Allow loopback connections - When checked, allows the VNC connection over the loopback (local) interface. Checked by default. This is required for use with iTivity encrypted or tunneled connections. Allow only loopback connections - When checked, restricts VNC connections to the loopback (local) interface. This provides extra security because only iTivity's encrypted connections are allowed with the VNC server. This is recommend for use with iTivity encrypted or tunneled connections. Checked by default. HTTP server This feature is not used with iTivity. Logging Log information to WinVNC.log: When checked, the Tridia VNC server writes logging (debug) information to the WinVNC.log file in the iTivity bin directory (C:\Program Files\iTivity\Unattended iAgent\bin). Default is unchecked. Log detailed debugging information: When the above option is checked, you can check this box to log include low-level troubleshooting information in the WinVNC.log file. Connection priority This setting indicates how the TridiaVNC server handles requests for more than one simultaneous connection. · Disconnect existing connections - Drops all existing (previous) connections when a new iTivity connection arrives. · Automatic shared sessions - Allows multiple, simultaneous iTivity connections. · Refuse concurrent connections - (Default) Rejects new iTivity connections when an existing connection is present. 7.1.1.2 FTP Server Configuration
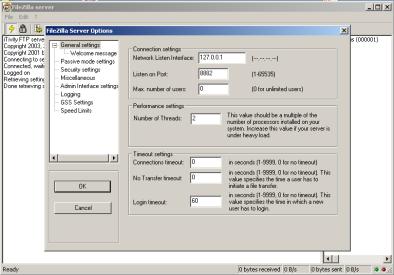
This option is used to configure and launch the Unattended iAgent's included FTP server. About the FTP ServerThe FTP Server is launched automatically whenever the Unattended iAgent starts. The server must be running and properly configured for the Unattended iAgent to allow a File Transfer connection with the iTivity iManager. By default, the FTP Server is set to listen on the local host IP address (127.0.0.1) and to an arbitrary port number 8882. This allows the FTP server to work automatically in most cases. However, if another program is using port 8882, the FTP server will not work unless you change its port number as described below. Configuring the FTP ServerYou need to use this procedure only if you need to allow File Transfer sessions through the Unattended iAgent and if the default configuration does not work on the local computer. 1. Choose Start > All Programs > iTivity > Unattended iAgent > Administrative Tools > FTP Server Configuration. The Connect to Server dialog is displayed:
2. Click the OK button. Note: Do not change the Server Address or Port in this dialog. The FTP Server window is displayed. This window will display the log of FTP server activity. You can also use the menu options available in this window to more fully configure the FTP server. The following screen image shows an example of the configuration options you can set.
3. Under Connection settings in the right pane, change the Port and/or Server Address as necessary. If you enter an FTP server address other than the default for the local host, you must also enter a password for that server. 4. Click OK. Then close the FTP server main window. 5. To allow the Unattended iAgent to locate the new port number in use by the FTP server, update the following registry setting: HKEY_LOCAL_MACHINE\Software\iTivity\ This is a DWORD (integer) setting that must contain the same port number on which the FTP server is listening. For an example registry file that updates this setting, refer to: C:\Program Files\iTivity\config\ 6. Stop and then restart the Unattended iAgent. 7.1.1.3 Set Unattended iAgent Simple Password
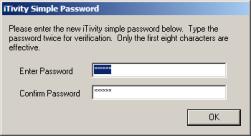
You can use this option to change the password used by a remote user of iTivity iManager to view this computer. This password applies only if Simple Password was chosen as the Authentication Method when the Unattended iAgent was installed. If NTLM was chosen, any entry in this dialog is ignored. Note: If the iTivity iManager is installed on this computer, you can also set the password on the Security tab of the Tools > Options dialog. See Section 4.1.4.6, Options. Enter the password twice, then click OK to reset the password.
7.1.1.4 Start Unattended iAgent
You can use this option to start the Unattended iAgent. The iAgent immediately connects to the iServer and the Unattended iAgent icon appears in the system tray.
7.1.1.5 Stop Unattended iAgent
You can use this option to stop the Unattended iAgent when it is currently running. The iAgent immediately disconnects from the iServer and the Unattended iAgent icons are removed from the system tray. 7.1.1.6 Reset Unattended iAgent Secure Dial Failure
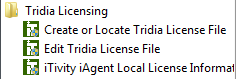
This option appears only if the Unattended iAgent was installed with the secure dial feature enabled. Use this option to reset the secure dial function. If an iManager user cannot authenticate or attempts to connect with an unencrypted connection three times, the modem will be locked. If this happens, the Reset Unattended iAgent Secure Dial Failure option must be used to re-enable the connection. 7.1.2 Tridia Licensing
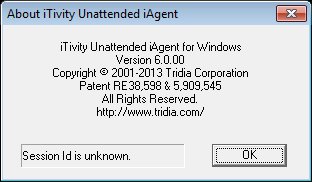
These functions can be used to license the Unattended iAgent separately from the iServer. When an iAgent is licensed separately, its connection to an iServer does not count as one of the connections allowed by the iServer license. Contact Tridia for more information on this option. The procedures are the same as for entering or editing license codes on the iServer. See Section 2.4, Licensing the iServer on Windows, for instructions. 7.1.3 About iTivity Unattended iAgentChoose Start > All Programs > iTivity > Unattended iAgent > About iTivity Unattended iAgent to display an About box showing version information for the Unattended iAgent.
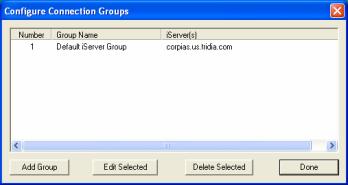
7.1.4 Edit Unattended iAgent iServer Connection SettingsYou can use this option to edit the information for connecting to the iServer and for opening or closing a connection. Choose Start > All Programs > iTivity > Unattended iAgent > Edit Unattended iAgent iServer Connection Settings to display following dialog.
You can use this dialog to configure the iAgent to connect to more than one iServer and/or support group. You can also edit and delete the connections. 7.1.4.1 About Multiple iServer Connections
On startup, the iAgent makes a connection with each connection group defined here. The iAgent attempts to connect to each iServer in a connection group until a successful connection is established. This results in one iServer connection per defined connection group. 7.1.4.2 Working with Connection Settings
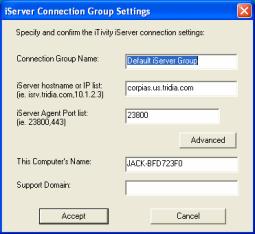
Click the Add Group or Edit Selected button to display the iServer Connection Group Settings dialog. If you are adding a Group, the fields are displayed with default entries.
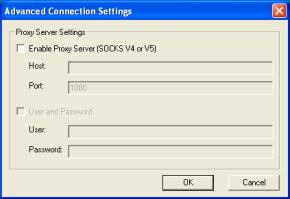
Use this dialog to define or edit the connection settings. The Advanced button displays the Advanced Connection Settings dialog:
You can use this dialog to enable connection to the iServer through a SOCKS V5 proxy server and to enter the proxy server settings. See Section 5.6, Using the iTivity iAgents with a Proxy Server for more information. 7.2 System Tray Options
When the Unattended iAgent is running, the following icon is shown in the Windows system tray:
Right-click on this icon to display the following popup menu:
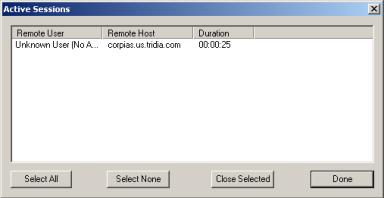
7.2.1 Show Active SessionsThis option displays a dialog showing active remote control sessions currently viewing this computer as host. You can use the buttons to select and close any or all of the sessions. When NTLM authentication is used, the NTLM user name is shown for each session. The name of the iServer is shown in the remote host column.
7.2.2 Show Certificate FingerprintSelecting the Show Certificate Fingerprint option displays the Certificate Fingerprint. The Unattended iAgent automatically generates an encryption certificate the first time it runs. This unique certificate is presented to the iTivity iManager to ensure encryption of all session data transmitted between the Unattended iAgent and the iManager. The first time the iTivity iManager attempts to view the host, the user is asked to confirm the host’s certificate fingerprint. After the first connection, the remote machine retains the fingerprint in its cache for the next viewing session. For more information on certificates, see the iTivity Deployment Guide. 7.2.3 About iTivity Unattended iAgentSelect this option to display an About box showing version information for the Unattended iAgent. The Session ID is also shown.
7.2.4 Stop Unattended iAgentYou can use this option to stop the Unattended iAgent when it is currently running. The iAgent immediately disconnects from the iServer and the Unattended iAgent icons are removed from the system tray.
Copyright © 2017 - 2023, iTivity Corporation |