|
6. Using the Attended iAgent
The Attended iAgent allows users of Windows computers to connect to an iServer and request support. The support request is then displayed in the iTivity iManager. The Attended iAgent creates an "on-demand" rather than a persistent connection. Depending on how it is installed, the iAgent can also allow users to chat with an administrator responding to their help request. Users typically install the Attended iAgent by downloading a custom EXE installer. It can also be installed from a distribution MSI file. See Chapter 5for information on installing the iTivity iAgents. 6.1 Requesting Support
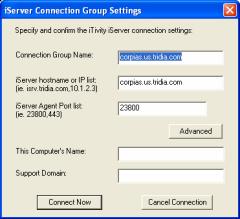
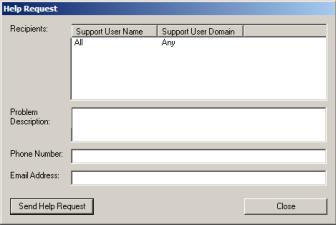
After the Attended iAgent is installed, a user can easily connect to their assigned iServer and issue a Help Request. 1. Choose Start > All Programs > iTivity > Attended iAgent > iTivity Help. Or double-click the icon on the desktop: If the Attended iAgent is not already connected, it launches and displays the iServer Connection Group Settings dialog:
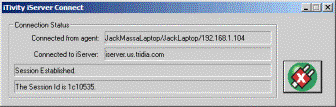
2. Click Connect Now to connect to the default iServer. OR, if you have access to more than one iServer, you can change the connection information and then click Connect Now. Depending on how the Attended iAgent was configured during installation, one or both of the following windows may be displayed.
3. If the Help Request window is available as shown above, you can use it to communicate information about the support problem. Fill in the Problem Description. If this is your first help request, you will also need to fill in the Phone Number and/or Email address to make these available to the support person. Note: The Problem Description, Phone Number, and Email Address are not required when sending a help request. These fields are intended to provide useful information to the support person. Note: If the Help Request Window is not displayed, you can display it by Right-Clicking on the iTivity icon in the system tray. See Section 6.4.2. 4. Click on one or more Support User Names to select them as recipients of the help request. 5. Click Send Help Request. You are prompted to verify sending the Request.
6. Click OK. The request is sent and the Help Request window is closed. 6.2 Using Chat
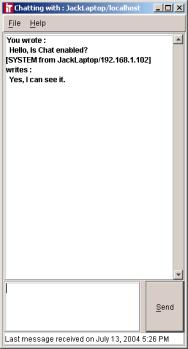
The Attended iAgent includes a Chat function, allowing a user to respond to a Chat session initiated by the iTivity iManager. Once a Chat session has been opened, the user of the Attended iAgent computer has full use of the Chat window. Note: Whether Chat is available depends on how the Attended iAgent is configured for installation. See Chapter 5 for information.
See Section 4.1.3.11, Chat, for more information on using Chat. 6.3 Attended iAgent Start Menu Options
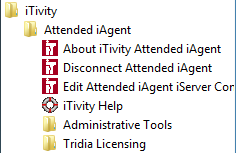
When the Attended iAgent is installed, the following options are made available on the Windows Start menu.
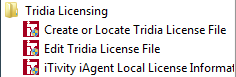
6.3.1 Tridia Licensing
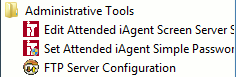
These functions can be used to license the Attended iAgent separately from the iServer. When an iAgent is licensed separately, its connection to an iServer does not count as one of the connections allowed by the iServer license. Contact Tridia for more information on this option. The procedures are the same as for entering or editing license codes on the iServer. See Section 2.4, Licensing the iServer on Windows, for instructions. 6.3.2 Administrative ToolsThe Administrative Tools menu option presents a flyout menu with additional options.
6.3.2.1 FTP Server Configuration
This option is used to configure and launch the Attended iAgent's included FTP server. This function is the same as for the Unattended iAgent and is described in Section 7.1.1.2 , FTP Server Configuration. 6.3.2.2 Edit iTivity Screen Server Settings
This option can be used to edit the default settings for the TridiaVNC Server module. This module runs as part of the Attended iAgent to allow remote control and viewing of the computer. Note: When the Attended iAgent is active, the computer is considered a VNC host. The TridiaVNC settings you can edit are the same as for the Unattended iAgent. For information, see Section 7.1.1.1, Edit iTivity Screen Server Settings. 6.3.2.3 Set Attended iAgent Simple Password
You can use this option to change the password used by a remote user of iTivity iManager to view this computer. This password applies only if Simple Password was chosen as the authentication method when the Attended iAgent was installed. If another option was chosen, any entry in this dialog is ignored. Note: If the iTivity iManager is also installed on this computer, you can also set the password on the Security tab of the Tools > Options dialog. See Section 4.1.4.6, Options. Enter the password twice, then click OK to reset the password.
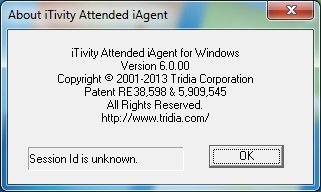
6.3.3 About iTivity Attended iAgentChoose Start > All Programs > iTivity > Attended iAgent > About iTivity Attended iAgent to display an About box showing version information for the Attended iAgent.
6.3.4 Disconnect Attended iAgentYou can use this option to disconnect from the Attended iAgent after a connection has been established. 6.3.5 Edit Attended iAgent iServer Connection SettingsYou can use this option to edit the information for connecting to the iServer and for opening or closing a connection. The connection settings and procedures are the same as for the Unattended iAgent. For information, see Section 7.1.5 Edit Unattended iAgent iServer Connection Settings. 6.3.6 iTivity HelpThis option is used to issue a support request. See Section 6.1, Requesting Support, for details. 6.4 System Tray Options
When the Attended iAgent is running, the following icon is shown in the Windows system tray:
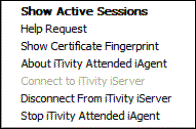
Right-click on this icon to display the following popup menu:
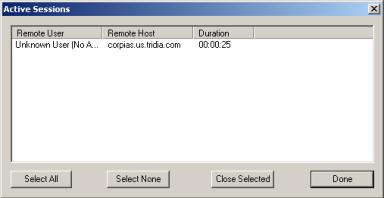
6.4.1 Show Active SessionsThis option displays a dialog showing active remote control sessions currently viewing this computer as host. You can use the buttons to select and close any or all of the sessions. When NTLM authentication is used, the NTLM user name is shown for each session. The name of the iServer is shown in the remote host column.
6.4.2 Help RequestThis option displays the Help Request window, which you can use to send a Help Request. See Step 3 under Section 6.1 Requesting Support.
6.4.3 Show Certificate FingerprintSelecting the Show Certificate Fingerprint option displays the Certificate Fingerprint. This option is the same as for the Unattended iAgent. See Section 7.2.2 for more information. 6.4.4 About iTivity Attended iAgentThis option displays an About box showing version information for the Attended iAgent.
6.4.5 Connect to iTivity iServer / Disconnect from iTivity iServerYou can use these options to connect to or disconnect from an iServer. If you choose Connect, the iServer Connection Settings dialog displays. If you choose to Connect when you are already connected, the Help Request window displays. See Section 6.1 for more information on these windows. 6.4.6 Stop iTivity Attended iAgentYou can use this option to stop the Attended iAgent. The iAgent exits and is removed from the system tray. You can start the iAgent again by choosing Start > All Programs > iTivity > Attended iAgent > iTivity Help.
Copyright © 2017 - 2023, iTivity Corporation |