|
2. Deploying the iTivity Agents
This chapter provides information and recommendations for deploying the iServer Agent software. The Live Support Agent and Admin Agent can be run on Windows systems. The Admin Agent can also be run on a number of Linux/UNIX platforms. 2.1 System Requirements and Recommendations
Windows
The Live Support Agent and Admin Agent both can run on the following Windows platforms: · Windows 2000 · Windows XP Pro · Windows 2003 Server · Windows ME · Windows NT 4.0 with Service Pack 3 · Windows 98 Disk space required to install the Admin Agent or Live Support Agent is approximately 8.6 megabytes. Linux/UNIX
The Linux/UNIX version of the Admin Agent requires the following platform. SoftwareAny of the following operating systems: · Red Hat 9.0 or Red Hat Enterprise or later · Solaris SPARC 2.8/2.9 for 32 and 64 bit systems · AIX 4.3.3, 5.1, 5.2 32 and 64 bit systems. · HP-UX 11.00/11.11 32 and 64 bit systems · SCO 3.2.5 Hardware· 60 MB minimum disk space · 5MB RAM baseline, · 300 Mhz minimum CPU 2.2 Installing the Agent Software
Installation on Windows
Three methods are available for installing the Live Support Agent and Admin Agent on Windows systems. Detailed instructions are presented in the iTivity User Guide.
Editing the HTML Files for One-Click Install
The Support Module is an iTivity distribution that provides the software needed to deploy the Admin Agent and Live Support Agent on Windows. The Support Module can be installed as part of the iServer installation process or separately. Installing the Support Module creates a set of files that are typically copied to a web server. These files include web pages that allow users to perform one-click install of the Agents. The following standard HTML files are installed by the Support Module. These files can easily be re-branded to match the look and feel of your organization's Intranet or web site.
Important: Administrators must edit these HTML files to set configuration parameters. These parameters control the setup and operation of the Live Support Agent and Admin Agent on the end-users' computers. For descriptions on the parameters and values, see the iTivity User Guide, Section 5.3 Editing the Agent HTML Files. Installation on Linux/Unix
While the Live Support Agent is available only for Windows, the Admin Agent is also available for Linux and various versions of UNIX. The installation is via a tar file that can be downloaded from the Tridia web or FTP sites. Configuration options are controlled through the Agent configuration file, /etc/iTivity/AdminAgent.conf. For more information, see the iTivity User Guide, Chapter 8, Installing and Running the Admin Agent on Linux or UNIX. 2.3 Controlling Agent Service Access Permissions
The iTivity agents allow a number of distinct remote access services, including VNC, FTP, RDP, chat, and Telnet. Each of these access services can be independently enabled or disabled on each Agent. On Windows agents, this is accomplished through the following registry setting: HKLM\Software\Tridia\iTivity\Connector_rc\ On the Linux/UNIX versions of the Admin Agent, this is accomplished by setting the defaultHostPermissions line in the AdminAgent.conf file, which is installed in the /etc/iTivity/ folder. This "defaultHostPermissions" setting controls which services an iManager user can access on the Agent system. Each individual service is controlled via a bit flag in this integer. (See the Examples below.) The iManager user must first authenticate with the Agent system before being allowed to access any services. After authentication (and the authorization check), the user is subject to the permissions restrictions listed in the table. The "Win-only" and "UNIX-only" values are optional and apply only to Agents on those respective platforms.
Default is to Enable All ServicesThe default setting is to allow access to all supported iTivity services (after the user authenticates and passes authorization check). Therefore the default setting is 65535 Example settingsThe following table shows other example settings you can use to fine-tune access to the Agent system.
2.4 Deploying the iServer public key (certificate)
For the highest security, the agents should have a certificate installed that contains the public key from the iServer. This automates trust between the Agent and the iServer while insuring the security of the data communications. In particular, employing the certificate can protect against so-called "man in the middle" attacks. Note: These instructions also apply to deploying the iManager. How the Certificate is Used
Every time an Agent connects to an iServer, the Agent searches to see if a valid, trusted certificate exists for the iServer. The search is done using a "hashed" value to match the name of the certificate file. When a match is found the SSL fingerprint of the connecting iServer is validated using the certificate on the Agent. If validated the iServer is positively identified and trusted. If a trusted certificate is not found, a dialog is displayed on the Agent computer, prompting the user to accept the connection. If the user accepts, their response is stored and the dialog will not appear the next time the Agent connects to this iServer. If the user does not accept (or if no user is present, as is often the case with the Admin Agent) connection to the iServer fails. Important: For Agents systems that will not have a user present at the first connection to the iServer, it is therefore necessary to deploy the certificate as described below. Note on iManager: The iManager also searches for a trusted certificate when it connects to an iServer. If the iManager user needs to verify the certificate number before allowing the connection, the number can be obtained as follows. On the Agent computer, right-click on the iTivity icon in the system tray and select the Show Certificate Fingerprint option. After connecting, the iManager computer will retain the fingerprint in its cache for future sessions. About the Certificate File
A self-signed SSL certificate is automatically generated on the iServer when the iServer software is first launched. In order to deploy the certificate, the file must be renamed. The filename must be changed to the MD5 hash value of the certificate subject. The SSL certificate includes the public key and private key pair. The public key certificate is placed in a file named "root.pem". This file is typically located as follows: On Widows: C:\Documents and Settings\LocalService On Linux: /usr/lib/iTivity/iServer/itivity_data Steps to Automatically Deploy the Certificate
This section explains how to automate the deployment of the iServer public key certificate during the Agent installation. This procedure assumes you will install the Agent software using the one-click process and the HTML settings file. For more information on this installation method, see the iTivity User Guide, Chapter 5, Installing the iTivity Agents on Windows. The process includes these steps: 1. Copy the automatically generated root.pem file from the iServer to the web-accessible directory you will use for one-click installation of the agents. 2. Rename the file to the subject hash value. 3. Place the file inside the directory you use for one-click installation of the agents. 4. Change the “varRootCertURL” setting in the Agent HTML files to point to the unique iServer public certificate file. Result: When you install the agents via the one-click method, the Agent software will find and recognize the certificate and trust the iServer. Step 1: Copying the root.pem fileManually copy the root.pem file from the iServer to the web-accessible directory you will use for one-click installation of the agents. The file is created in the following folder when the iServer is first launched: [install directory]\itivity_data\root.pem Step 2: Hashing the iServer Root Certificate and Renaming the FileTo obtain the hash value name for the iServer root.pem certificate file, run the bin/openssl.exe or bin/openssl program as follows: [iServer installation Directory]\bin\openssl.exe x509 -noout -hash -in [Path to iServer root certificate]\itivity_data\root.pem Windows Command Example: C:\Program Files\iTivity\bin\openssl.exe x509 -noout -hash -in "C:\Documents and Settings\LocalService Linux Command Example: /usr/lib/iTivity/iServer/bin/2.4.XX/9.0/openssl x509 -noout -hash -in /usr/lib/iTivity/iServer/itivity_data/root.pem The hash value will be displayed to the console: ad732b5c Next, create a copy of the root.pem file with the new name: Example: cp root.pem ad732b5c.0 Step 3: Copy the renamed file to the One-click install directoryCopy the renamed public key certificate file to the web server directory containing the one-click install HTML files. These files are normally installed in a folder you specify when you install the Support Module during installation of the iServer. For information, see the iTivity User Guide, Chapter 2, Installing and Running the iServer. Step 4: Edit the Agent HTML filesUpdate the one-click HTML files to change the “varRootCertURL” setting so that it points to the full URL of the new public key certificate file. Example: ether.SetProperty( "varRootCertURL", "http://iserver.acmecorp.com/itivity/ad732b5c.0" ); For information on the HTML files, see the iTivity User Guide, Section 5.3, Editing the Agent HTML Files. 2.5 Controlling input dialogs (Windows Only)
You can control the availability of Agent input and status dialogs using various registry settings or settings in the one-click HTML files. These dialogs allow the user of the Agent system to control and monitor connections to the iServer. In the Live Support Agent, some of these dialogs are enabled by default. In the Admin Agents they are generally disabled under the assumption that no user is present at the console of the Admin Agent system. iServer Connection Settings Dialog
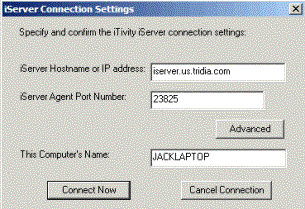
The iServer Connection Settings Dialog allows the user to configure which iServer the Agent will connect to. The associated Advanced dialog allows configuration of an optional proxy server connection if required.
This dialog is enabled by a simple flag. A setting of zero disables the dialog and any other setting enables the dialog. Examples: HKLM\Software\Tridia\iTivity\Connector_rc showConnectIASDialog=dword:00000001 Connection Status Dialog
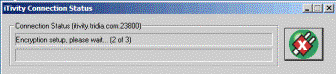
The Connection Status Dialog shows the Agent user whether the Agent is successfully connected to the iServer and allows the user to disconnect at any time.
This dialog is typically used with the Live Support Agent, since that Agent is generally launched interactively by the user. The “showIASStatusDialog” is a simple flag. A setting of zero disables the dialog and any other setting enables the dialog. Example: HKLM\Software\Tridia\iTivity\Connector_rc The “titleIASStatusDialog” setting contains a string that is displayed in the title bar of the Connection Status Dialog. This setting is used to customize the connection status dialog to indicate which iTivity customer is providing technical support. You can place your company name or service name in this setting so that your customers will recognize the iTivity connection as part of your service. For example, "Acme Corp. Technical Support Center" would be an appropriate setting for the iTivity deployment of the Acme technical support center. Example: HKLM\Software\Tridia\iTivity\Connector_rc “titleIASStatusDialog”=”iTivity Live Support Agent Connection Status” Help Request Dialog
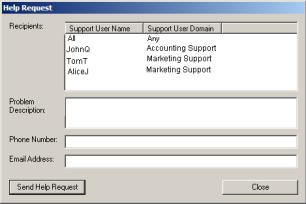
The Help Request Dialog allows the Agent user to enter information specific to their request for help. When this dialog is used, the request is forwarded across the iServer to iManagers that have the Help Desk window open.
This dialog is enabled by a simple flag. A setting of zero disables the dialog and any other setting enables the dialog. Example: HKLM\Software\Tridia\iTivity\Connector_rc showHelpRequestDialog=dword:00000001 View Permission Dialog
The View Permission dialog allows the Agent user to confirm that a viewing session from an iManager user should be allowed. The dialog is timed so that a default selection of rejecting the connection will occur if there is no input from the Agent user. There are settings to enable or disable the dialog as well as control the timeout period and whether it should default to allowing or rejecting the connection. showAllowSessionDialog is a simple flag. A setting of zero disables the dialog and any other setting enables the dialog. Example: HKLM\Software\Tridia\iTivity\Connector_rc showAllowSessionDialog=dword:00000001 allowSessionDialogTimeout is an integer value that specifies the number of seconds to wait for input from the Agent user. Example: HKLM\Software\Tridia\iTivity\Connector_rc allowSessionDialogTimeout=dword:0000001d timeoutHostPermissions is a bit field flag. A setting of zero rejects the connection entirely when the dialog timeout is reached without input from the Agent user. A setting of 0xffffffff (-1) accepts the connection with full permissions when the dialog timeout is reached without input from the Agent user. For information on configuring permission to individual services, see Section 2.3, Controlling Agent Service Access Permissions. Example: HKLM\Software\Tridia\iTivity\Connector_rc timeoutHostPermissions=dword:00000000
Copyright © 2017 - 2023, iTivity Corporation |